New PC?
Reproduce your familiar environment, files and settings on a new PC
Duplicating your familiar computing environment on a new PC can be a challenge, but the Files and Settings Transfer Wizard in Windows XP helps automate the process.
1. Using the wizard
The wizard provides options that walk you through the process of migrating to a new computer. You can:
| • | Choose how to store files and settings that are migrated. The wizard supports several methods for copying files and settings that you want to transfer. We'll examine two that don't require a network environment: | • | Using removable media or storage device | | • | Using direct cable connection from your old computer to your new computer |
|
| • | Customise which files and settings get migrated. If you already know exactly which files and settings you want to migrate, you can add or remove files directly in the wizard. |
2. What gets migrated
The settings you'll migrate fall into four major groups:
| • | Appearance. This includes wallpaper, colours, sounds and the location of the taskbar. |
| • | Action. This includes items such as whether double-clicking a folder opens it in a new window or the same window, and whether you need to double-click or single-click an item to open it. |
| • | Internet. These are settings for connecting to the internet and controlling how your browser operates - for instance, your home page URL, favourites or bookmarks and security settings. |
| • | Mail. This includes the information you need to connect to your mail server, your signature file, views, mail rules, local mail and contacts. The mail clients supported are Outlook and Outlook Express. |
The wizard also can migrate specific settings for Word, Excel and other Microsoft Office programs, but the actual programs are not migrated. You will still need to re-install applications on your new computer.
Files are migrated by file type (.DOC), folder (C:\My Documents) and specific name (C:\Important\money.mny). The wizard moves many of the common file types and folders by default and gives you the option of adding or removing them.
3. Migrating using removable media or storage drives
Using the wizard is a three-step process.
Step 1: Start the wizard on your new computer
To migrate your files and settings without access to a network or cable to connect your old and new computer, first start the wizard on your new computer:
1. | Click Start, All Programs, Accessories, System Tools, Files and Settings Transfer Wizard. When the Welcome to the Files and Settings Transfer Wizard page appears, click Next. |
2. | Ensure New Computer is selected and click Next. |
3. | In the Do you have a Windows XP CD? page, select I want to create a Wizard Disk in the following drive: and click Next. |
4. | Insert a blank and formatted 3.5 inch floppy disk into your new computer's floppy drive. The wizard creates the disk and prompts you to go to your old computer.
Note: If your new computer does not have a floppy drive (many new PCs no longer include one) then select I will use the wizard from the Windows XP CD option. Click Next and follow the instructions for using the Windows XP CD you bought or that came with your computer. |
Step 2: Start the wizard on your old computer
Next, you run the wizard on your old computer to capture your settings and files. You will to need designate a way to transfer the data during this step. Because 3.5 inch floppy disks have limited storage capacity, they are not a viable option for most complete settings and file transfers. You may be able to copy your settings to several floppy disks, but it will take too many floppies and too long to copy all your files. In addition, many new PCs no longer come with built-in floppy drives to read the disks.
Some better options are to copy your settings and files to:
| • | High-capacity removable disks such as ZIP disks |
| • | A hard drive location where you can then burn them to a writeable CD |
| • | A removable drive such as a high-capacity USB storage device |
Remember: To transfer your settings and files, your new computer must have a drive that can read the media on which the files and settings are stored.
To start the files and settings transfer:
1. | Insert the wizard disk into your old computer. When the Welcome to the Files and Settings Transfer Wizard page appears, click Next. |
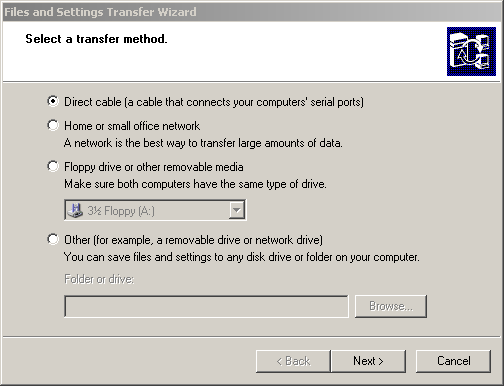
2. | In the Which computer is this? page, select Old computer. The Select a transfer method page appears as shown.
 |
3. | In the Select a transfer method page, select either: | • | Floppy drive or other removable media and click Next.
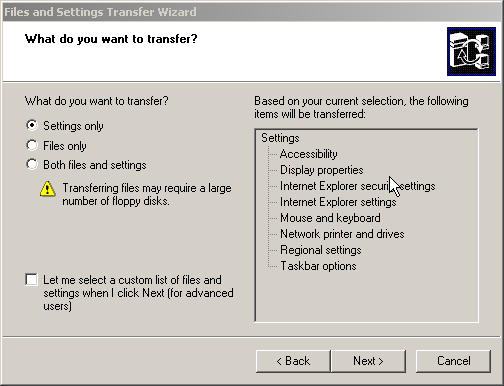
- or - | | • | Other, then Browse to a hard drive or removable drive location where you want to copy your settings and files. Click Next. The What do you want to transfer page appears, as shown.

This page lets you select settings only, files only, or both files and settings. Details of each option appear in the right pane. | | • | For the purposes of getting started with this wizard, select Settings only and click Next. The wizard scans your old computer and collects all of the settings you requested to migrate. This usually takes a few minutes, depending on the speed of your computer. | | • | When prompted, label and insert the removable media, or indicate the drive location you selected and click OK. If you are prompted, insert additional disks until the wizard completes. | | • | When the Completing the Collection phase page appears, click Finish. |
Return to your new computer and continue with the wizard. |
Step 3: Resume using the wizard on your new computer
You now return to your new computer with disks or the removable drive that holds your settings and files.
| • | The wizard you left running on your new computer should still be on the Now go to your old computer page. Click Next. |
| • | When the Where are the Files and Settings page appears, select Floppy drive or other removable media, or select Other and browse to the drive location. Click Next. |
| • | Insert the disks or indicate the drive location. Click Next. |
| • | The wizard reads the collected files and settings and applies them to your new computer. |
| • | When all of the settings and files have been applied, the wizard will reach the Finished page. Click Finished. For the changes to take effect, you are prompted to restart your computer. |
4. Migrating using a direct connection cable
Another simple way to migrate files and settings is to use a direct cable that connects your computers via the serial ports. You will need a serial PC to PC file transfer cable, available from most computer stores. The process requires only two steps.
Step 1: First start the wizard on your new computer
1. | Click Start, All Programs, Accessories, System Tools, Files and Settings Transfer Wizard. When the Welcome to the Files and Settings Transfer Wizard page appears, click Next. |
2. | Ensure New Computer is selected and click Next. |
3. | In the Do you have a Windows XP CD? page, select I want to create a Wizard Disk in the following drive: and click Next. |
4. | Insert a blank and formatted 3.5 inch floppy disk into your new computer's floppy drive. The wizard creates the disk and prompts you to go to your old computer. |
Step 2: Starting the wizard on your old computer
1. | Insert the wizard disk into your old computer. |
2. | When the Welcome to the Files and Settings Transfer Wizard appears, click Next. |
3. | When the Select a Transfer Method page appears, select Direct Cable and click Next. |
4. | When the Set up your serial connection page appears, complete the following steps: 1. | Connect your computers with a serial PC to PC file transfer cable. | 2. | Go to the other computer and advance the wizard to the Set up your serial connection page. | 3. | Click Autodetect on both wizards to select the serial port setting. |
|
5. | When the wizard shows a successful connection, click Next. |
The wizard automatically transfers your files and settings to your new computer. You will need to restart your computer for the changes to take effect.
Note: Some settings may not be restored to your Windows XP-based computer. Settings for devices that are either not available on or incompatible with Windows XP will not be transferred. A list of files or folders that were not restored to their original locations appears on the Completing the Files and Settings Transfer Wizard page of the Files and Settings Transfer Wizard.
The following types of items may not be transferred:
| • | Third-party driver files for devices that are not installed on the Windows XP-based computer. |
| • | Network printers that are not available on the Windows XP-based computer. |


